Login to your admin panel
Go to https://provision.realsmart.co.uk/ and check that the "Active Directory" option is available in your sidebar, if not you will need to contact realsmart to enable the AD sync feature. Select "Active Directory".
General Settings
Active Directory (AD) Sync Tool - General Settings Tutorial
This page allows you to configure how your system connects to your Active Directory and how user data is synchronized. Please review each section carefully to ensure accurate data transfer.
1. AD DC Settings
This section defines the connection to your Active Directory Domain Controllers.
Domain Name: Enter the full DNS name of your Active Directory domain (e.g., DC=realsmart,DC=local). This is crucial for the tool to locate your AD environment.
Domain Name Without DC: In this field, enter the same as above, but without DC= and a dot between the two DC references (e.g. realsmart.local).
2. Test Mode
This option allows you to test the synchronisation process in an OU appended with _test, and users also created with the same appended _test.
Test mode (import test student and staff data): If you check this box, the sync tool will import a set of test student and staff data. This is highly recommended for initial setup and testing to ensure your configurations are correct before syncing real user data. Remember to uncheck this once you are ready for a live synchronization.
2. OU Options
Organisational Units (OUs) are containers within Active Directory that help organise and manage users, groups, and other objects. These settings control how the sync tool interacts with OUs for staff and student accounts.
Staff - Update OUs After Initial Creation
These options determine how the tool handles the OUs for staff accounts after they are initially created in AD.
Update OU on each pass: Updates staff OUs on every sync based on changes in the source system.
Only set OU on creation in AD: Sets the staff OU only during initial account creation
Students - Update OUs After Initial Creation
These options function identically to the Staff OU update options but apply to student accounts.
Update OU on each pass: Updates student OUs on every sync based on changes in the source system.
Only set OU on creation in AD: Sets the student OU only during initial account creation.
Carefully consider which OU update option best suits your organisational structure and how you intend to manage staff and student accounts over time.
3. Include Protected Users
Protected Users are users with smartsync turned OFF in realsmart, this usually includes users that have been created manually.
Staff
Don't include protected staff: If selected, staff members who have smartsync turned off will be excluded from the synchronisation.
Include protected staff: If selected, staff who who have smartsync turned off will be included from the synchronisation.
Students
Don't include protected staff: If selected, student members who have smartsync turned off will be excluded from the synchronisation.
Include protected students: If selected, student members who who have smartsync turned off will be included from the synchronisation.
It is recommended to not include protected staff and students unless you need them in AD for a specific reason.
4. Username Settings
These settings control how usernames are generated during the synchronisation process.
Remove Dashes and Apostrophes: If checked, any dashes (
-) or apostrophes (') present in the source data used to generate usernames will be removed. This can help ensure consistency and compatibility with Active Directory username policies.
Staff Display Name, options available: %PF%PFFC%LF%LFFC%PS%PSFC%LS%LSFC
This setting defines the format for how staff display names will appear in Active Directory. You can use the following placeholders to customise the display name:
%PF: Preferred Forename%PFFC: Preferred Forename First Character%LF: Legal Forename%LFFC: Legal Forename First Character%PS: Preferred Surname%PSFC: Preferred Surname First Character%LS: Legal Surname%LSFC: Legal Surname First Character
Example: To display staff names as "Preferred Surname, Forename First Character" (e.g., "Smith, J"), you would enter %PS, %PFFC.
Student Display Name, options available: %PF%PFFC%LF%LFFC%PS%PSFC%LS%LSFC
This setting works identically to the Staff Display Name setting but controls the format for student display names. Choose a format that is consistent and easy to understand for your environment.
5. AD Mappings
This section allows you to map values from your source system to corresponding values in Active Directory, currently you can map the "Office field" to the following values in Realsmart:
Forename
Surname
Username
MIS ID
UPN/Staff Code
6. AD Windows Application Details
This section contains settings specific to the Windows application used for the AD sync tool.
School ID: Your unique identifier for your school.
Token: This is your authentication token or API key required for the sync tool to securely connect to your Active Directory on the source system. Treat this information as sensitive and do not share it.
Active Directory (AD) Sync Tool - Staff Settings Tutorial
This page allows you to configure specific settings that apply to staff user accounts during the Active Directory synchronisation.
1. Active Directory Staff Accounts
This section controls the fundamental actions performed on staff accounts in Active Directory during the sync.
Process Staff: This is a master switch. Ensure this box is checked if you want the sync tool to process and manage your staff user accounts in Active Directory. If unchecked, no changes or updates will be made to staff accounts.
Change Password Next Logon: If checked, the system will force staff users to change their password the next time they log in to their Active Directory account. This is often used for new accounts or after a password reset to ensure security.
Password Never Expires: If checked, the passwords for staff accounts will be set to never expire. Use this option with caution, as it can have security implications. Consider your organisation's password policies before enabling this.
Cannot Change Password: If checked, staff users will be prevented from changing their Active Directory passwords. This is typically used for service accounts or in specific scenarios where password changes need to be centrally controlled.
Default Staff AD Password: Here, you can set a default password that will be assigned to newly created staff accounts during the synchronisation process. It is highly recommended to combine this with the "Change Password Next Logon" option to ensure users are prompted to set a strong, unique password upon their first login.
2. Active Directory Settings
This section defines the location and profile settings for staff accounts within your Active Directory.
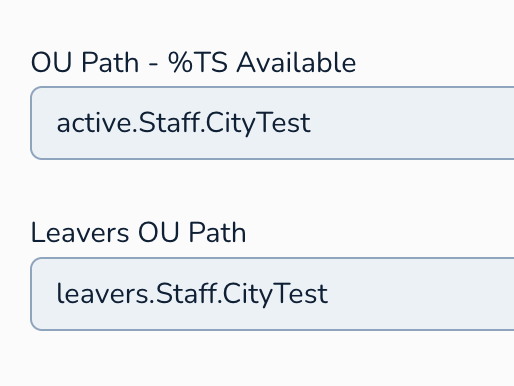
Please note that when you enter an OU path it is in reverse order, and separated by dots, for example:
active.Staff.CityTest
The above would be the equivalent in AD as: CityTest -> Staff -> active
OU Path - %TS Available: This field specifies the default Organisational Unit (OU) where new staff accounts will be created in Active Directory. You can enter the distinguished name of the OU here. The placeholder
%TSis a variable that will be replaced by a specific value based on the staff member's job type (Teaching/Non-Teaching) as defined in the "OU Settings By User Type" section below. Using%TSallows for dynamic placement of staff accounts into different OUs based on their role.
An example OU might be: %TS.active.Staff.CityTestLeavers OU Path: Enter the distinguished name of the OU where staff accounts will be moved when they are marked as leavers (e.g., when they leave the organisation) in your source system. This helps to keep active and inactive accounts separate in your Active Directory.
An example leavers path may be leavers.Staff.CityTest
3. User Profile
These settings define the user profile path, logon script, and home folder for staff accounts.
Profile path: You can specify a network path where staff user profiles will be stored. This is often a shared network location. Leaving it blank might result in local profiles being created on each computer the user logs into.
Logon script: If you have a script that needs to run automatically when a staff member logs in (e.g., to map network drives or configure settings), you can specify the path to that script here (usually a
.vbsor.batfile on a network share).
4. Home Folder
These settings define the location for a staff member's personal file storage.
Connect Path: This is the network path to the shared folder that will be the user's home drive (e.g.,
\\server\staff_homes\%username%). The%username%variable will typically be replaced by the staff member's Active Directory username, creating a unique home folder for each user. We usually set this to the same value as the Local Path.Local Path / UNC: You can specify either a local path on the user's computer (less common in managed environments) or a UNC (Universal Naming Convention) path to a network share for the home folder. Using a UNC path is the standard practice in most organisations.
Drive: Here, you specify the drive letter that will be mapped to the staff member's home folder on their computer (e.g.,
H:).
An example for Home folder would be:

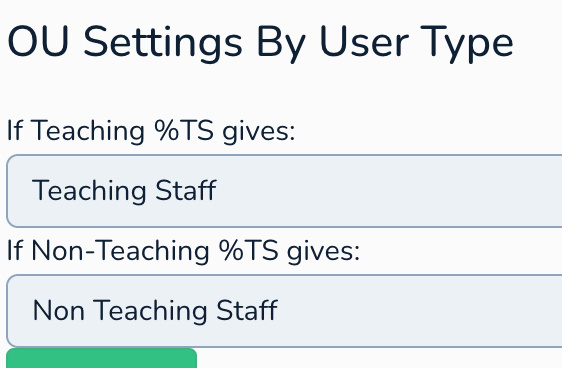
5. OU Settings By User Type
This section allows you to define different OU paths based on whether a staff member is classified as "Teaching" or "Non-Teaching" in your source system. This leverages the %TS variable mentioned in the "OU Path" setting.
If Teaching %TS gives: Enter the specific part of the OU path that should replace
%TSfor staff members identified as "Teaching Staff". For example, if your main staff OU path is%TS.Staffand you want teaching staff to go into an "Teaching Staff" sub-OU, you would enterTeaching Staff. The final OU path for teaching staff would then becomeOU=Teaching Staff,OU=Staff.If Non-Teaching %TS gives: Similarly, enter the specific part of the OU path that should replace
%TSfor staff members identified as "Non Teaching Staff". For example, you might enter%TS.Staff. Their final OU path would beOU=Non Teaching Staff,OU=Staff.
Active Directory (AD) Sync Tool - Staff Groups
This page allows you to associate Active Directory Groups with staff that are created in AD.
1. Active Directory Settings
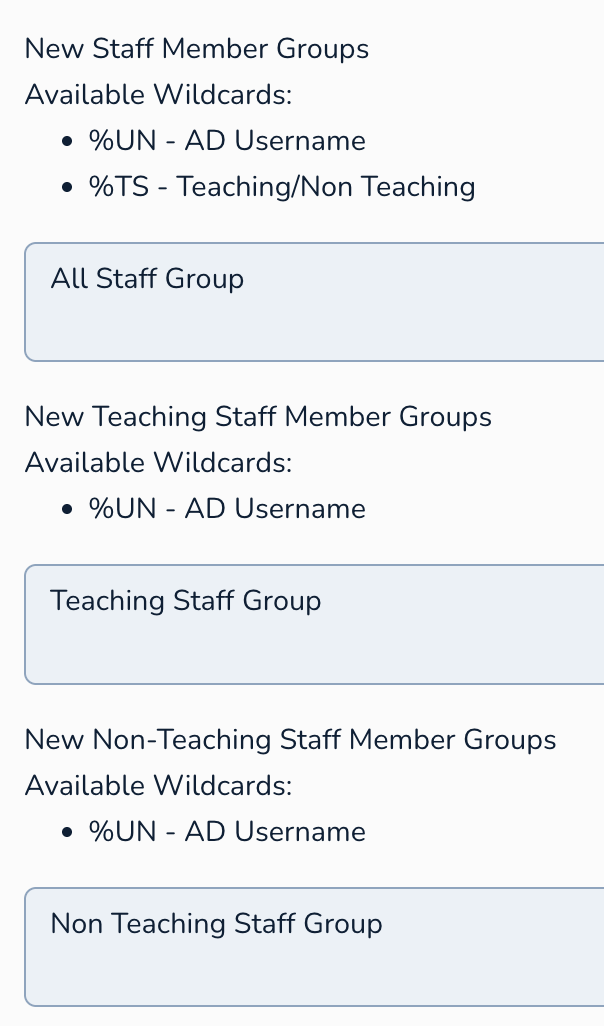
This section contains the primary settings for creating new staff member groups.
Available Wildcards:
%UN- This wildcard will be replaced by the Active Directory username of a staff member. This could be useful if you are creating user-specific groups (though less common for general staff groups).%TS- Teaching/Non Teaching, as defined on the Staff Settings page.
2. New Teaching Staff Member Groups
This section allows you to define specific naming patterns for groups that will primarily contain teaching staff members.
Available Wildcards:
%UN- As before, this represents the Active Directory username.%TS- Teaching/Non Teaching.
3. New Non-Teaching Staff Member Groups
This section allows you to define specific naming patterns for groups that will contain non-teaching staff members.
Available Wildcards:
%UN- Represents the Active Directory username.%TS- Teaching/Non Teaching.
Key Considerations and How to Use These Settings:
Purpose of Groups: The Groups are setup in your AD system
Leveraging Wildcards: Using the wildcards, specifically %TS will allow you to match up any Groups you have in AD that might be specific to teaching and non-teaching staff.
Group Membership: This page primarily focuses on the association of existing Groups.
Consistency: Aim for a consistent and logical naming convention that makes it easy to understand the purpose and membership of each group in Active Directory.
Testing: After configuring these settings, be sure to run the sync tool in test mode to check the Groups are associating as expected based on the defined patterns.
Active Directory (AD) Sync Tool - Staff Custom Scripts Settings Tutorial
This page enables you to specify custom scripts that will be run when new staff member accounts are created in Active Directory through the sync tool. You can define different scripts based on whether a staff member is categorised as "Teaching" or "Non-Teaching" and utilise various wildcards to make the script execution dynamic.
1. New Staff Member Scripts
This section allows you to define a script that will run for all new staff members, regardless of their teaching/non-teaching status.
You can include command-line arguments for the script.
Available Wildcards: These wildcards can be used within the script path or its arguments. The sync tool will replace them with the corresponding values for the newly created staff member:
%UN- The Active Directory username of the new staff member.%TS- Indicates whether the staff member is "Teaching" or "Non-Teaching".%SC- The staff code or identifier from your source system.%DAY- The current date in the formatd/m/Y(e.g.,29/04/2025).%TIMESTAMP- The current date and time in the formatd/m/Y H:i:s(e.g.,29/04/2025 15:00:00).%ORG- The name of the school or organization as configured in the tool.
Example: If you enter:
set-aduser -identity "%UN" -title "Teacher" -company "%ORG" -description "Created by Realsmart - %DAY" -employeenumber "%SC" -office "Office1"
The above script will be executed.
2. New Teaching Staff Member Scripts
This section allows you to define a script that will only run for new staff members identified as "Teaching". This overrides any script defined in the "New Staff Member Scripts" section for teaching staff.
Enter the full path to the script and any necessary command-line arguments.
Available Wildcards: The same wildcards are available as in the general staff scripts section:
%UN%TS(will always be "Teaching" in this context)%SC%DAY%TIMESTAMP%ORG
3. New Non-Teaching Staff Member Scripts
This section allows you to define a script that will only run for new staff members identified as "Non-Teaching". This overrides any script defined in the "New Staff Member Scripts" section for non-teaching staff.
Enter the full path to the script and its arguments.
Available Wildcards: The same wildcards are available:
%UN%TS(will always be "Non-Teaching" here)%SC%DAY%TIMESTAMP%ORG
How to Use Custom Scripts Effectively:
Automation: Use scripts to automate tasks that need to be performed immediately after a new staff account is created in Active Directory, such as:
Setting specific user attributes not directly managed by the sync tool.
Adding the user to specific Active Directory groups based on their role or department.
Creating or modifying files or folders for the user.
Interacting with other systems or applications.
Conditional Logic: By having separate sections for teaching and non-teaching staff, you can execute different scripts or pass different arguments based on the staff member's type.
Wildcard Usage: Leverage the available wildcards to make your scripts dynamic and context-aware. This ensures that the scripts operate on the specific user account being created and have access to relevant information
Testing: Thoroughly test your custom scripts in a non-production environment before implementing them in your live synchronisation process. Verify that the scripts execute as expected and achieve the desired outcome for new staff accounts.
Active Directory (AD) Sync Tool - Student Settings Tutorial
This page allows you to configure specific settings that apply to student user accounts during the Active Directory synchronisation.
1. Active Directory Student Accounts
This section controls the fundamental actions performed on student accounts in Active Directory during the sync.
Process Students: This is the main switch for student account processing. Ensure this box is checked if you want the sync tool to manage student user accounts in Active Directory. If unchecked, no changes or updates will be made to student accounts.
Change Password Next Logon: If checked, student users will be forced to change their password the next time they log in to their Active Directory account. This is often used for newly created accounts or after a password reset for security purposes.
Password Never Expires: If checked, the passwords for student accounts will be set to never expire. Exercise caution when using this option and consider your organisation's security policies regarding password expiration for student accounts.
Cannot Change Password: If checked, student users will be prevented from changing their Active Directory passwords. This might be used in specific scenarios where password changes need to be centrally managed.
Default Student AD Password: Here, you can set a default password that will be assigned to newly created student accounts. It is highly recommended to enable "Change Password Next Logon" in conjunction with setting a default password to ensure students are prompted to create a unique password upon their first login.
2. Active Directory Settings
This section defines the location and profile settings for staff accounts within your Active Directory.
Please note that when you enter an OU path it is in reverse order, and separated by dots, for example:
active.Students.CityTest
The above would be the equivalent in AD as: CityTest -> Students -> active
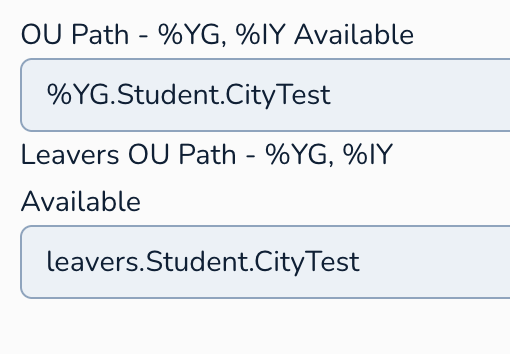
OU Path - %YG %IY Available: This field specifies the default Organisational Unit (OU) where new student accounts will be created in Active Directory. You can enter the distinguished name of the OU here. The placeholders
%YG, %IYare variables that will be replaced by a specific value based on the student's year group and defined further down on this page.
An example OU might be: %YG.active.Students.CityTestLeavers OU Path: Enter the distinguished name of the OU where student accounts will be moved when they are marked as leavers (e.g., when they leave the organisation) in your source system. This helps to keep active and inactive accounts separate in your Active Directory.
An example leavers path may be leavers.Students.CityTest
3. Home Folder
These settings define the location for a staff member's personal file storage.
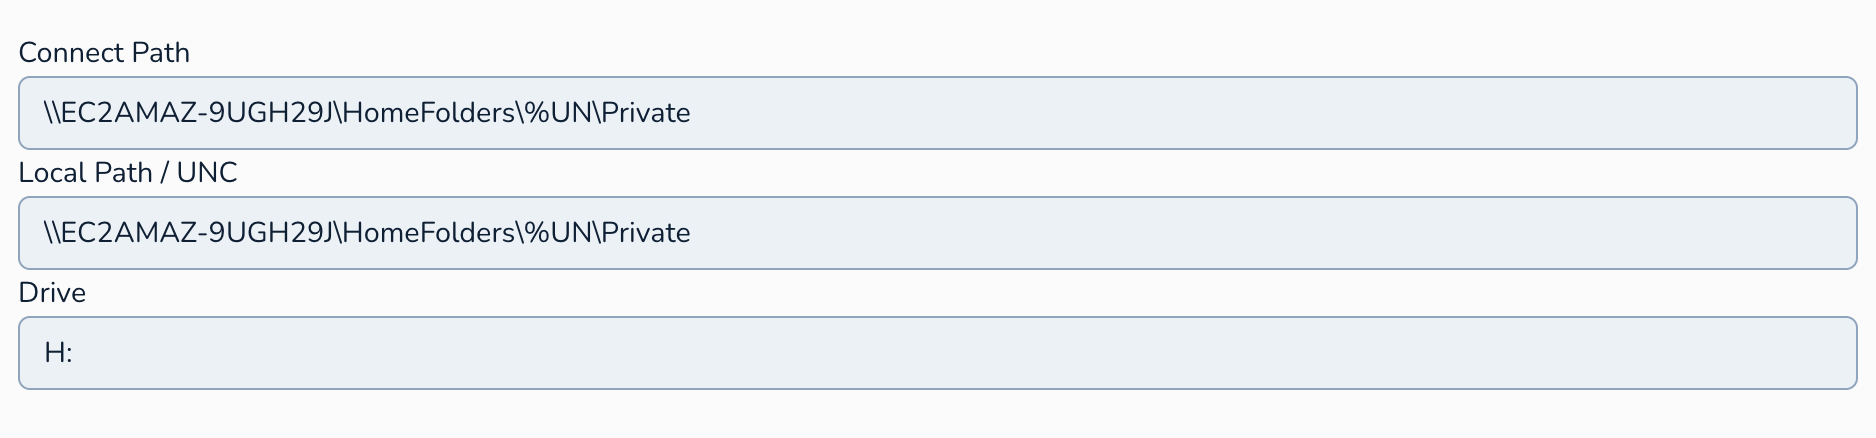
Connect Path: This is the network path to the shared folder that will be the user's home drive (e.g.,
\\server\student_homes\%username%). The%username%variable will typically be replaced by the staff member's Active Directory username, creating a unique home folder for each user. We usually set this to the same value as the Local Path.Local Path / UNC: You can specify either a local path on the user's computer (less common in managed environments) or a UNC (Universal Naming Convention) path to a network share for the home folder. Using a UNC path is the standard practice in most organisations.
Drive: Here, you specify the drive letter that will be mapped to the staff member's home folder on their computer (e.g.,
H:).
An example for Home folder would be:
4. Year Group Settings %YG
This table is crucial for translating the year group names as they appear in your source system (e.g., "Year 7", "Y8") to how you want them to appear in the OU paths within Active Directory. For each year group in your source system, enter its exact name in the left column and the corresponding Active Directory representation in the right column. This mapping is used to replace the %YG wildcard in the "OU Path" and "Leavers OU Path" settings.
Example:
realsmart Year Group AD Year Group Year 01 Year 1 Year 02 Year 2 Year 03 Year 3 Year 04 Year 4 Year 07 Year 7 Year 08 Year 8 Year 09 Year 9 Year 10 Year 10 Year 11 Year 11 Year 12 Year 12 Year 13 Year 13
Ensure you have mappings for all relevant year groups present in your source data.
4. Intake Year Settings %IY
This table functions similarly to the "Year Group Settings" but focuses on the intake year of the students. You need to map how the intake year is represented in your source system to how you want it to appear in the OU paths (specifically when using the %IY wildcard in the "OU Path" or "Leavers OU Path").
Example:
realsmart Intake Year AD Intake Year Year 01 Intake2025 Year 02 Intake2024 Year 03 Intake2023 Year 04 Intake2022 Year 07 Intake2021 Year 08 Intake2020 Year 09 Intake2019 Year 10 Intake2018 Year 11 Intake2017 Year 12 Intake2016 Year 13 Intake2015
The values in the left column should precisely match how the intake year is recorded in your source system. The right column defines how you want that intake year to be represented in your Active Directory OU structure.
By carefully configuring these student user settings, you can automate the creation, management, and organisation of student accounts within your Active Directory based on their year group and intake year. Ensure that your year group and intake year mappings are accurate to maintain a well-structured and easily manageable student user environment. Remember to test your configuration thoroughly before running a live synchronisation.
Active Directory (AD) Sync Tool - Student Groups
This page allows you to associate Active Directory Groups with students that are created in AD.
1. Active Directory Settings
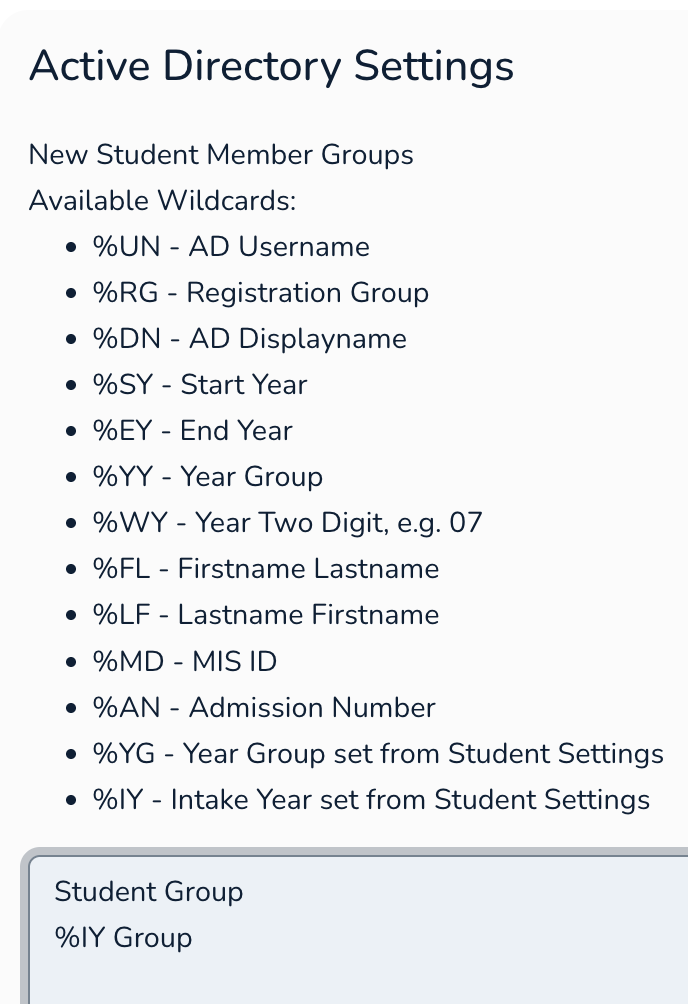
This section contains the primary settings for creating new student member groups.
Available Wildcards:
%UN - AD Username
%RG - Registration Group
%DN - AD Displayname
%SY - Start Year
%EY - End Year
%YY - Year Group
%WY - Year Two Digit, e.g. 07
%FL - Firstname Lastname
%LF - Lastname Firstname
%MD - MIS ID
%AN - Admission Number
%YG - Year Group set from Student Settings
%IY - Intake Year set from Student Settings
Key Considerations and How to Use These Settings:
Purpose of Groups: The Groups are setup in your AD system
Leveraging Wildcards: Using the wildcards will allow you to match up any Groups you have in AD that might be specific to, for example intake years.
Group Membership: This page primarily focuses on the association of existing Groups.
Consistency: Aim for a consistent and logical naming convention that makes it easy to understand the purpose and membership of each group in Active Directory.
Testing: After configuring these settings, be sure to run the sync tool in test mode to check the Groups are associating as expected based on the defined patterns.
Active Directory (AD) Sync Tool - Student Custom Scripts Settings Tutorial
This page enables you to specify custom scripts that will be run when new student member accounts are created in Active Directory through the sync tool. You can utilise various wildcards to make the script execution dynamic.
1. New Staff Member Scripts
This section allows you to define a script that will run for all new staff members, regardless of their teaching/non-teaching status.
You can include command-line arguments for the script.
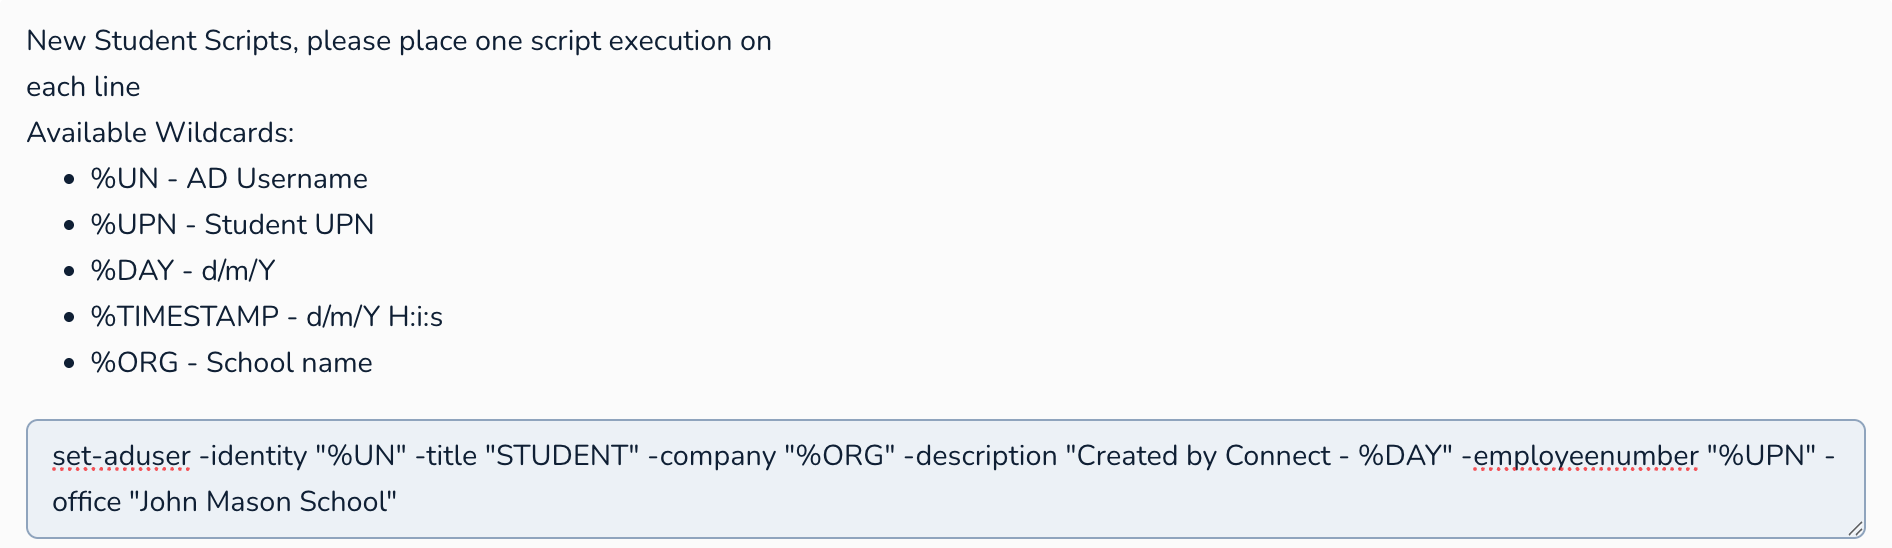
Available Wildcards: These wildcards can be used within the script path or its arguments. The sync tool will replace them with the corresponding values for the newly created staff member:
%UN - AD Username
%UPN - Student UPN
%DAY - d/m/Y
%TIMESTAMP - d/m/Y H:i:s
%ORG - School name
Example: If you enter:
set-aduser -identity "%UN" -title "STUDENT" -company "%ORG" -description "Created by Connect - %DAY" -employeenumber "%UPN" -office "John Masters School"
The above script will be executed.
2. How to Use Custom Scripts Effectively:
Automation: Use scripts to automate tasks that need to be performed immediately after a new staff account is created in Active Directory, such as:
Setting specific user attributes not directly managed by the sync tool.
Adding the user to specific Active Directory groups based on their role or year group.
Creating or modifying files or folders for the user.
Interacting with other systems or applications.
Conditional Logic: By having separate sections for teaching and non-teaching staff, you can execute different scripts or pass different arguments based on the staff member's type.
Wildcard Usage: Leverage the available wildcards to make your scripts dynamic and context-aware. This ensures that the scripts operate on the specific user account being created and have access to relevant information
Testing: Thoroughly test your custom scripts in a non-production environment before implementing them in your live synchronisation process. Verify that the scripts execute as expected and achieve the desired outcome for new staff accounts.
Active Directory (AD) Sync Tool - Exclusions Tutorial
Alright, let's learn how to use the exclusions settings for your Active Directory sync tool. This tutorial will show you how to prevent specific users or groups from being processed during the synchronization. This can be useful for excluding administrative accounts, service accounts, or groups that you don't want the sync tool to manage.
Active Directory (AD) Sync Tool - Exclusions Settings Tutorial
This page allows you to define lists of users and groups that the AD sync tool should ignore during its synchronisation process.
1. Active Directory Settings
This section contains the exclusion rules for both users and groups.
User Exclusions (username)
This setting allows you to specify usernames of Active Directory accounts that you want the sync tool to skip during synchronisation.
Enter one username per line.
Use
*as a wildcard character. This allows you to exclude multiple users based on a pattern in their usernames.
Examples:
To exclude a specific user with the username
adminuser, simply enter:adminuser
To exclude all users whose usernames start with temp, use the wildcard:
TMP_*
To exclude all users whose usernames end with svc, use the wildcard:
*svc
You can combine specific usernames and wildcard patterns:
administrator
guest
testuser1
temp*
*svc
In this case, the tool would ignore the administrator, guest, and testuser1 accounts, as well as any account starting with temp and any account ending with svc.
Group Exclusions
This setting allows you to specify the names of Active Directory groups that you want the sync tool to ignore during synchronisation. This means the tool will not attempt to manage any of the users in these groups, in active directory. This is particularly useful if you create a group in Realsmart specifically for exclusion in the AD sync.
Enter one group name per line.
Use
%as a wildcard character. This allows you to exclude multiple groups based on a pattern in their names.
Examples:
To exclude a specific group named
Domain Admins, enter:Domain Admins
To exclude all groups whose names start with Year10, use the wildcard:
Year10%
To exclude all groups whose names end with _DELETED, use the wildcard:
%_DELETED
You can combine specific group names and wildcard patterns:
Domain Controllers
Schema Admins
<code class="code-container formatted ng-tns-c774074440-56 no-decoration-radius" role="text" data-test-id="code-content" data-sourcepos="60:3-62:6">Year10</code>% %<code class="code-container formatted ng-tns-c774074440-57 no-decoration-radius" role="text" data-test-id="code-content" data-sourcepos="65:3-67:7">_DELETED</code>
Important Considerations for Using Exclusions:
Case Sensitivity: Usernames and group names in Active Directory are generally not case-sensitive. However, it's best practice to enter the names as they appear in your Active Directory to avoid any unexpected behaviour.
Impact of Exclusion: When you exclude a user or group, the sync tool will not make any changes to that object in Active Directory. This means if the source data for an excluded user or group changes, those changes will not be reflected in AD by the sync tool.
Review Regularly: It's a good practice to periodically review your exclusion lists to ensure they are still relevant and necessary. You might need to remove exclusions if you want the sync tool to start managing previously excluded objects.
Wildcard Specificity: Be mindful when using wildcards. Ensure your patterns are specific enough to exclude only the intended users or groups and don't inadvertently exclude objects you want the sync tool to manage.