How can we help?
Get help straight from our team...
User Guides
Realsmart Onedrive Shortcode
Adding Onedrive files and folders to your website.
Updated 3 weeks ago
Adding "Realsmart Onedrive Wordpress Integration" to Azure & Configuring OneDrive Permissions
This guide will walk you through registering a new application in Microsoft Azure, obtaining the Client ID, Client Secret, and Azure AD Tenant ID, and then granting it the necessary permissions to read files and folders from a user's OneDrive.
1. Register a New Application
First, you'll need to create a new application registration in Azure Active Directory as an Administrator.
Sign in to the Azure portal: Go to https://portal.azure.com/ and sign in with your Azure Administrator account.
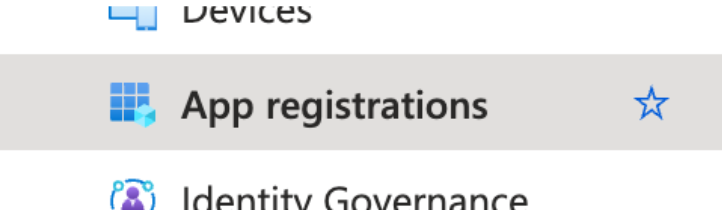
Navigate to Azure Active Directory:
In the Azure portal, search for and select "Azure Active Directory".
Go to App registrations:
In the Azure Active Directory blade, under "Manage", click on "App registrations"
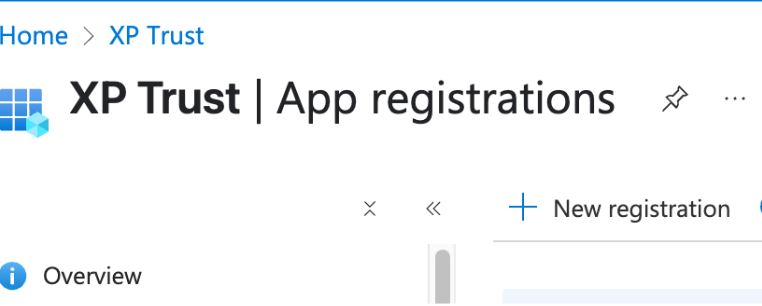
New registration:
Click on "+ New registration" at the top of the App registrations page.
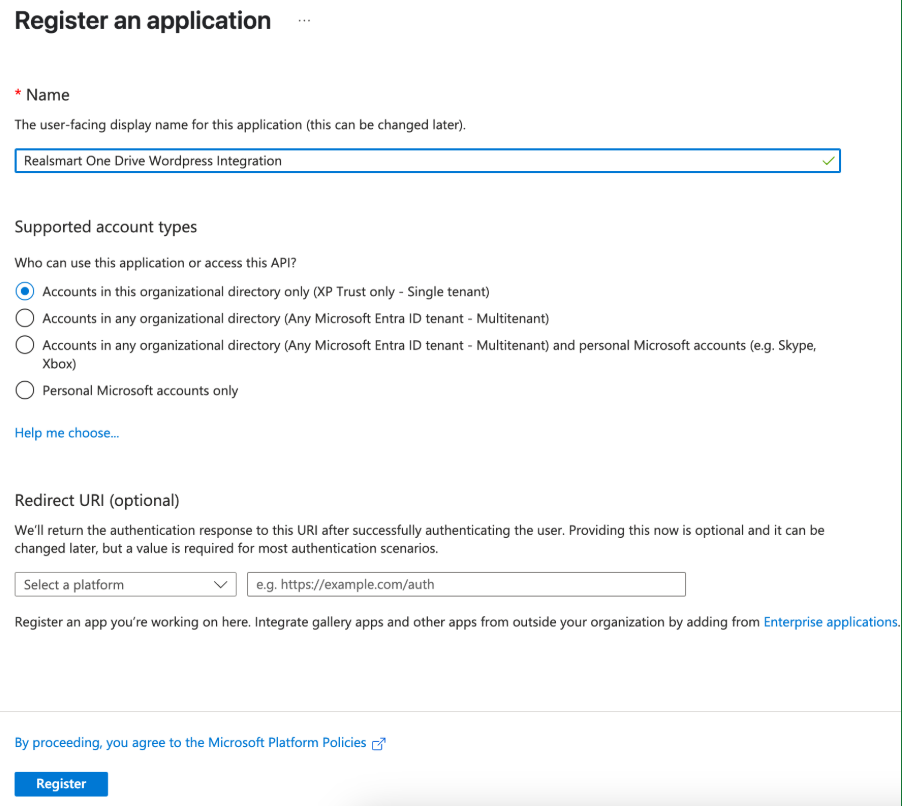
Register an application:
Name: Enter the name for your application: Realsmart One Drive Wordpress Integration.
Supported account types: Choose who can use this application. For most common scenarios, "Accounts in this organizational directory only (Default Directory only - Single tenant)" is appropriate if the application is for internal use. If it needs to be accessed from other organizations or personal Microsoft accounts, choose accordingly.
Redirect URI (optional but recommended): This is where Azure AD will send the authentication response.
Leave blank
Click the "Register" button at the bottom.
2. Get Client ID and Tenant ID
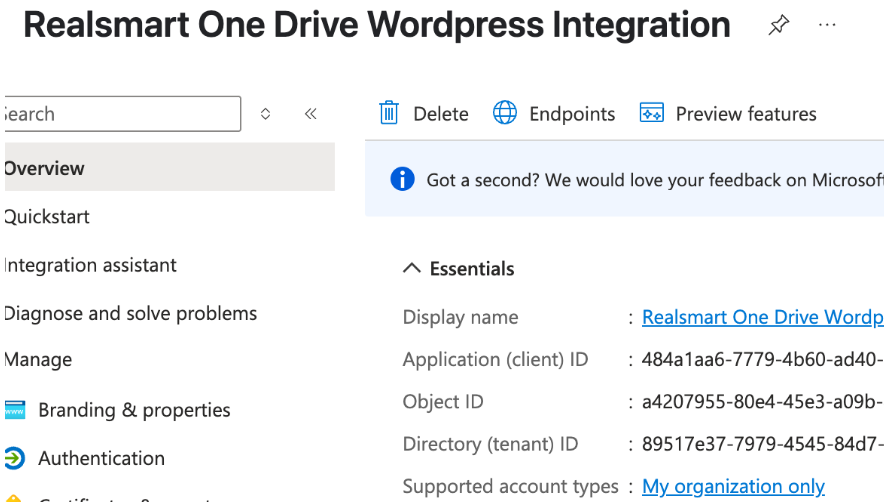
Once the application is registered, you'll be taken to its overview page.
Find Application (client) ID:
On the "Overview" page of your newly registered application, you will see the "Application (client) ID". Copy this value and store it securely. This is your Client ID.
Find Directory (tenant) ID:
You will also see the "Directory (tenant) ID" on this same "Overview" page. Copy this value and store it securely. This is your AD Tenant ID.
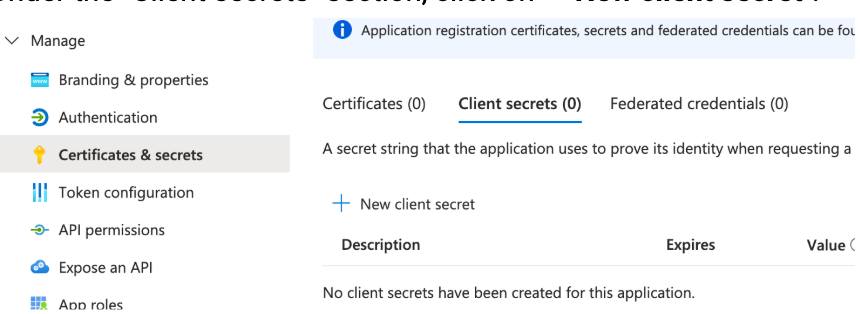
3. Generate a Client Secret
A client secret is a confidential application password that your application uses to prove its identity when requesting a token.
Navigate to Certificates & secrets:
In the left-hand menu for your application registration, under "Manage", click on "Certificates & secrets".
New client secret:
Under the "Client secrets" section, click on "+ New client secret".
Add a client secret:
Description: Enter a description for your secret (e.g., "Realsmart OneDrive WP Secret").
Expires: Choose an expiration period for the secret. Note: Secrets have a limited lifetime. You'll need to plan for secret rotation before it expires.
Click "Add".
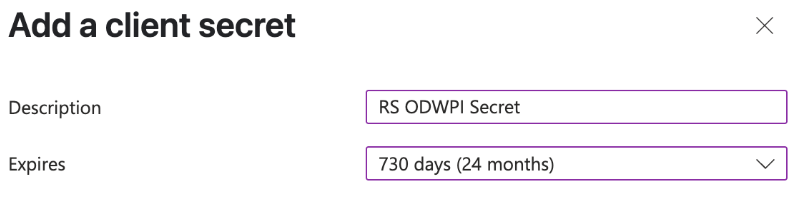
Copy the Client Secret Value:
IMPORTANT: The client secret value will be displayed immediately after you create it. Copy this value and store it securely. You will not be able to see it again after you leave this page. The "Secret ID" is different from the "Value".
4. Add API Permissions for OneDrive
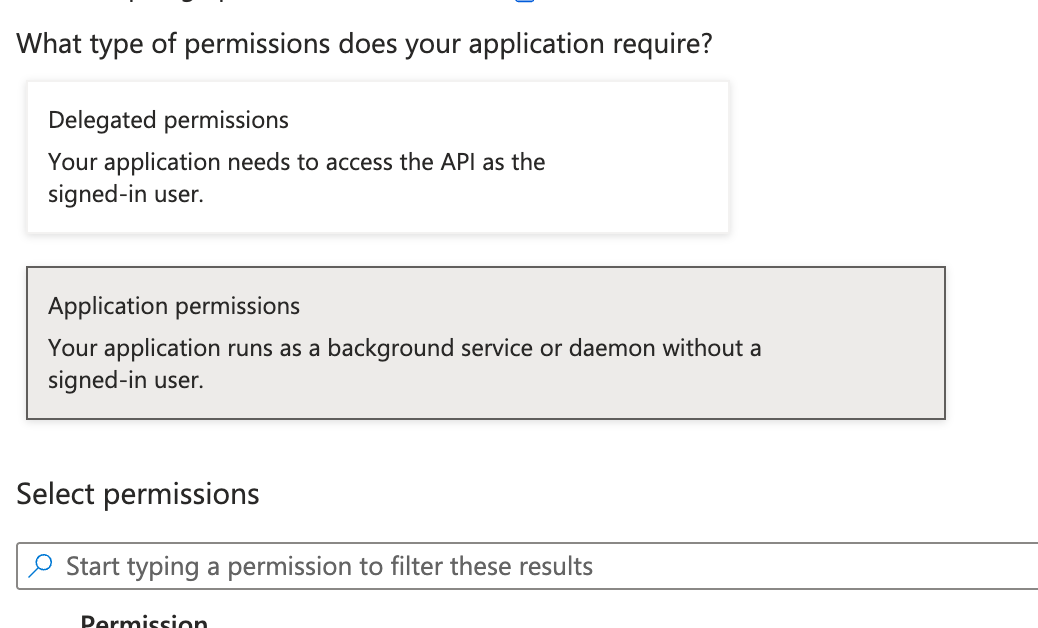
Now, you'll grant your application the necessary permissions to access OneDrive files. You'll add application permissions as requested.
Application Permissions: Used when your application runs as a background service or daemon without a signed-in user. It requires administrator consent and allows the application to access data it's been authorised for, across all users (unless restricted by specific policies).
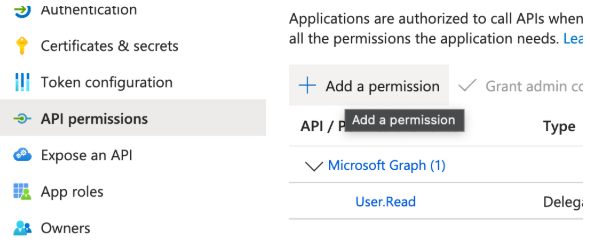
Navigate to API permissions:
In the left-hand menu for your application registration, under "Manage", click on "API permissions".
Add a permission:
Click on "+ Add a permission".
Select Microsoft Graph:
In the "Request API permissions" pane that appears, select "Microsoft Graph".

Choose permission type:
For Application Permissions (OneDrive - typically requires admin consent for all users):
Select "Application permissions".
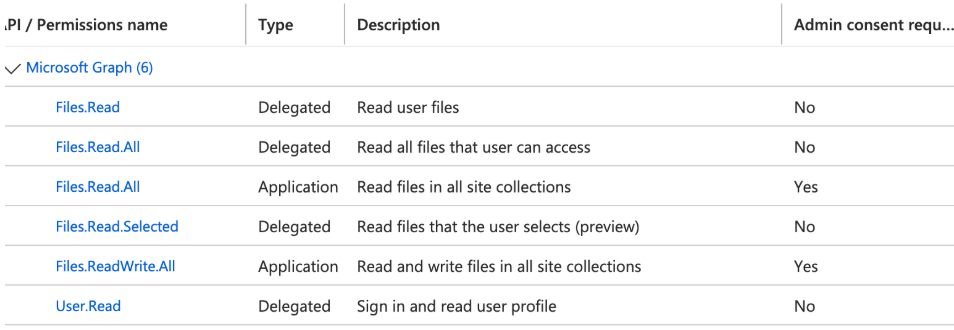
In the "Select permissions" search box, type Files.
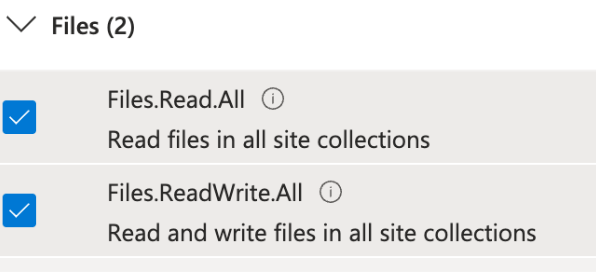
Expand "Files" and select the following permissions:
Files.Read.All: Allows the app to read all files in all site collections without a signed user. This is a high-privilege permission.
Click "Add permissions".
Grant admin consent (IMPORTANT):
After adding the permissions, you will see them listed.
For Application permissions, an administrator must grant consent.
If you are an administrator, you will see a button like "Grant admin consent for [Your Directory Name]". Click this button and then click "Yes" in the confirmation dialog.
If you are not an administrator, you will need to ask an Azure AD administrator in your organisation to grant consent for these permissions. The status column will indicate if consent is required/granted.
IMPORTANT: Make sure you have kept a note of the Client ID, Tenant ID and Client Secret, as that will be needed in the next section.
Setting Up The Plugin On Your Smartsite
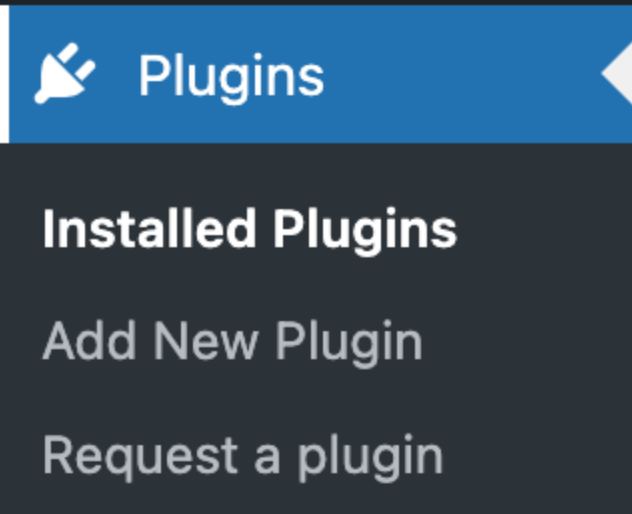
Activate the plugin
Go to the Plugins area:
Scroll down to Smart Onedrive Files
Ensure the plugin is “Activated”, as above
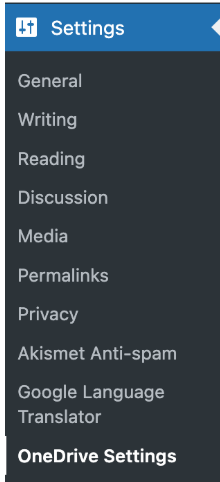
Go to settings in the sidebar
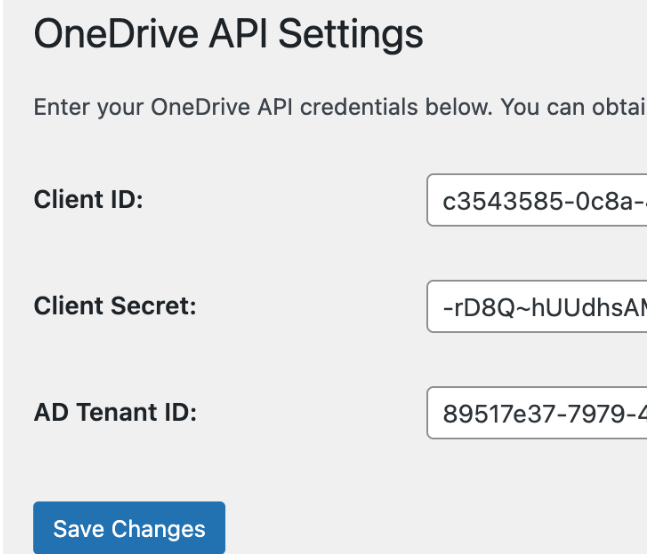
Now go to OneDrive Settings and fill in the details with those from the previous step.

Using The Plugin On Your Smartsite
Important: In order to use OneDrive Plugin on your site, create a folder in the root of your OneDrive area called “Realsmart”, this is for security purposes so that we can only access files in this area.
Understanding the Shortcode
The basic structure of the shortcode is:
[onedrive_files path="your_path" type="folder_or_file" owner_email="user_onedrive_email" order_by="name desc"]
This specific shortcode will:
Look for a folder named "Policies" directly in the root/Realsmart of the OneDrive belonging to the user with the email "user@tenant.co.uk".
Display the contents of this "Policies" folder.
The items within the folder will be sorted by their name in descending (Z-A) order.
Shortcode Attributes Explained
Here's a detailed explanation of each attribute you can use with the [onedrive_files] shortcode:
path (Required)
Purpose: Specifies the path to the folder or file you want to display within the owner's OneDrive.
How to use:
Ensure all files are within a “Realsmart” folder created in the root of OneDrive.
Now just use the folder or file name, from the Realsmart folder location (e.g., path="Policies" or path="MyDocument.docx").
If the item is within a subfolder, include the full path from the Realsmart folder, using forward slashes / as separators (e.g., path="Shared Documents/Staff/Teaching Plans.pdf" or path="Website/Specifications.docx").
type (Required)
Purpose: Defines whether the path attribute is pointing to a "folder" or a "file".
Possible Values:
folder: If the path points to a OneDrive folder. The shortcode will then list the contents of this folder.
file: If the path points to a specific file. The shortcode will then display information about this single file (its name, a download link).
Example: type="folder"
owner_email (Required)
Purpose: Specifies the email address of the OneDrive user whose files or folders you want to access.
How to use: Enter the full Microsoft 365 email address associated with the OneDrive account.
Important:
The Azure AD application you configured must have the necessary permissions (application) to access this user's OneDrive content.
Example: owner_email="***@*******t.co.uk"
order_by (used when type="folder")
Purpose: Determines the sorting order for the items displayed when the type is "folder".
How to use: Specify the criteria and the sort direction, separated by a space.
Common Criteria:
name: Sorts by file or folder name..
size: Sorts by file size
Sort Directions:
Leave blank: Ascending order (A-Z, oldest to newest, smallest to largest). This is often the default if no direction is specified.
desc: Descending order (Z-A, newest to oldest, largest to smallest).
Example: order_by="name desc" (shows files alphabetically Z-A) or order_by="name" (shows files alphabetically A-Z).
[onedrive_files path="Policies" type="folder" owner_email="***@*******t.co.uk" order_by="name desc"]
[onedrive_files path="Policies/devices.pdf" type="file" owner_email="***@*******t.co.uk"]